Machine learning with Java? Deeplearning4j! Part 2: Making predictions
by Enrique Llerena Dominguez
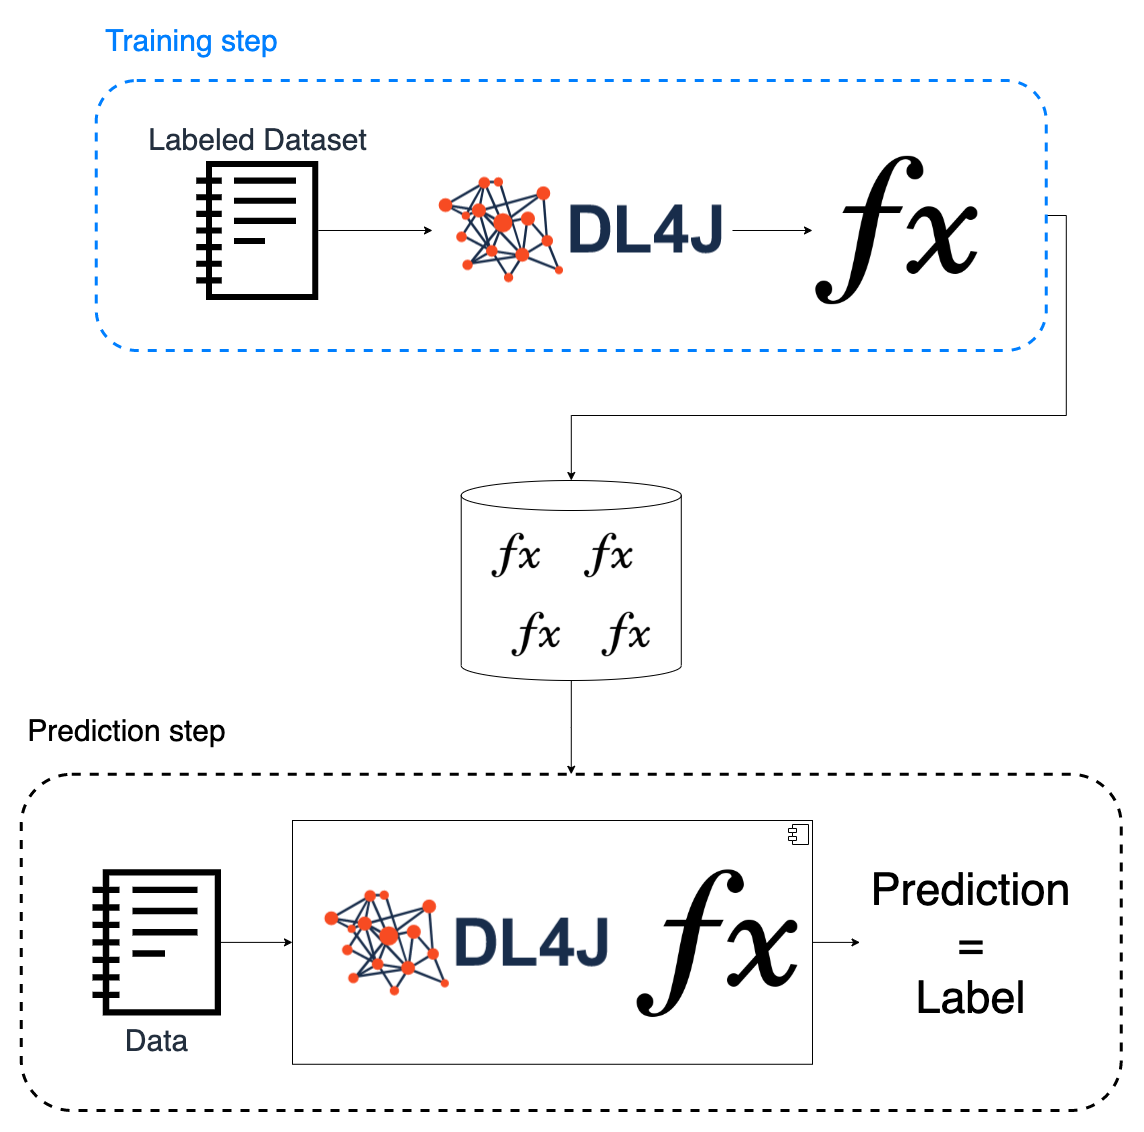
TL; DR
- The goal of this post is to show, step by step, how to load a previously trained model and have it make classification predictions using Deeplearning4j.
- The Machine Learning “hello world”, the iris dataset, is used to explain the basics of Deeplearning4j.
- The training step is covered in Part 1: Intro and training a model.
- All the code for this example can be found at the repository deeplearning4j-playground, more specifically at the file IrisClassifierPredictor.java.
Intro
All the setup required for this post, as well as more about Deeplearning4j, and how to train and save a model, can be found at Part 1: Intro and training a model.
Hands on example
We will see how to use Deeplearning4j applying it to the Iris Classification Dataset, AKA the Machine Learning Hello World. In this post, we will focus on the prediction step.
Steps
- Load the model
- Format the data
- Normalize the data
- Feed the data
- Get the label
- Automated testing
1. Load the model
In this step, we need to load the model from the repository we stored it on the last step of the Part 1: Intro and training a model. In this case, the repository is rather simple: the file system.
Remember that next to the model, we also need to load the normalizer, as we need it to normalize the data we will feed into the model so that such input is congruent with the training.
private static final String STORED_NORMALIZER_FILENAME = "normalizer";
private static final String STORED_MODEL_FILENAME = "trainedModel.zip";

//...

// Load the model
File locationToSaveModel = new File(basePath + STORED_MODEL_FILENAME);
MultiLayerNetwork restoredModel = MultiLayerNetwork.load(locationToSaveModel, false);

// Load the normalizer
File locationToSaveNormalizer = new File(basePath + STORED_NORMALIZER_FILENAME);
DataNormalization restoredNormalizer = NormalizerSerializer.getDefault().restore(locationToSaveNormalizer);
2. Format the data
The type of data that Deeplearning4j uses is the INDArray, hence, to feed data to a model,
we need to transform the way we represent data. In this case, the domain is represented with a class Iris,
which is transformed this way:
private final static int INDEX_SEPAL_LENGTH = 0;
private final static int INDEX_SEPAL_WIDTH = 1;
private final static int INDEX_PETAL_LENGTH = 2;
private final static int INDEX_PETAL_WIDTH = 3;
private final static int FIELDS_COUNT = 4;
// ..

private static INDArray getArray(Iris iris) {
    // It is important to use float. Using double,
    // the model would not work properly
    float[] input = new float[FIELDS_COUNT];
    input[INDEX_SEPAL_LENGTH] = iris.getSepalLength();
    input[INDEX_SEPAL_WIDTH] = iris.getSepalWidth();
    input[INDEX_PETAL_LENGTH] = iris.getPetalLength();
    input[INDEX_PETAL_WIDTH] = iris.getPetalWidth();

    // The empty constructor causes a NPE in add method
    NDArray ndArray = new NDArray(1, FIELDS_COUNT);
    DataBuffer dataBuffer = new FloatBuffer(input);
    ndArray.setData(dataBuffer);
    return ndArray;
}
There are some other considerations on this step:
- The order of the elements in the input arrays is important - it needs to be the same as it was on the training data set, e.g.
- Sepal length
- Sepal width
- Petal length
- Petal width
- Check the comments with the notes:
- The data type of the array is important - it must be a
float. Usingdouble, the model would not work properly. - When creating an
NDArray, the empty constructor shall not be used, as it would throw aNullPointerException, so we used the constructor specifying the rows and columns of the matrix.
- The data type of the array is important - it must be a
3. Normalize the data
As said earlier, the input data needs to be normalized the same way the training data was. This is easy using the normalizer that we loaded earlier:
// Transform the data to the required format
INDArray indArray = getArray(iris);

// Normalize the data the same way it was normalized in the training phase
dataNormalizer.transform(indArray);
4. Feed the data
Once we have the normalized data, we can feed it to the loaded machine learning model:
// Do the prediction
INDArray result = model.output(indArray, false);
5. Get the label
In the previous step, the model returned an array containing the probabilities of each class, where the index of the array corresponds to the alphabetical order of the labels, e.g.:
| Array Index | Label | Probability |
|---|---|---|
| 0 | Iris Setosa | 0.98266 |
| 1 | Iris Versicolour | 0.01715 |
| 2 | Iris Virginica | 0.00018 |
So, to find the predicted label, we need to find the class with the highest probability, in this example it is the Iris Setosa.
This is an easy task, as we just need to find the biggest value in an array. The below code is a simple approach:
private static int getIndexPredictedLabel(INDArray predictions) {
    int maxIndex = 0;
    log.debug("Predictions = {}", predictions.toString(1, false, 5));
    // We should get max CLASSES_COUNT amount of predictions with probabilities.
    for (int i = 0; i < CLASSES_COUNT; i++) {
        if (predictions.getFloat(i) > predictions.getFloat(maxIndex)) {
            maxIndex = i;
        }
    }
    return maxIndex;
}
Once we have the index with the highest probabilities, we need to map it to a label:
static final List<String> LABELS = Arrays.asList(
                                        "Iris Setosa",
                                        "Iris Versicolour",
                                        "Iris Virginica");

// ...

// Get the index with the greatest probabilities
int predictedLabelIndex = getIndexPredictedLabel(result);
log.debug("predictedLabelIndex= {}", predictedLabelIndex);
return LABELS.get(predictedLabelIndex);
6. Automated testing
This test assumes the existence of a model on a given path, which can be generated following the Part 1: Intro and training a model. In it, we need to:
- Instantiate the class
IrisClassifierPredictor, which holds the logic to load the model and make predictions. - Instantiate examples of the class
Iris, whose structure is shown below. - Feed the method
classifyan object of the classIris. - Get the label and assert it against the expected label.
Some code of the Iris class was omitted for clarity and conciseness:
public class Iris {
  // ...
    public Iris(float sepalLength,
                float sepalWidth,
                float petalLength,
                float petalWidth) {
        // ...
    }
// ...
Test code:
@Test
void classify() throws Exception {
    String modelPath =  "models/iris_classification/unit_test/";
    IrisClassifierPredictor irisClassifierPredictor =
                                new IrisClassifierPredictor(modelPath);

    Iris iris0 = new Iris(4.5f, 2.3f, 1.3f, 0.3f);
    String label0 = irisClassifierPredictor.classify(iris0);
    assertEquals(label0, "Iris Setosa");

    Iris iris1 = new Iris(6.2f, 2.2f, 4.5f, 1.5f);
    String label1 = irisClassifierPredictor.classify(iris1);
    assertEquals(label1, "Iris Versicolour");

    Iris iris2 = new Iris(6.2f, 3.4f, 5.4f, 2.3f);
    String label2 = irisClassifierPredictor.classify(iris2);
    assertEquals(label2, "Iris Virginica");
}
Serving this model
As this is a simple java class, it can be integrated with any other framework to interact with other components, exposing it for example via REST calls or asynchronously with a messaging system.
Conclusion
In this post, we went through the steps on how to use Deeplearning4j to load a trained model, and how to feed it data to perform a prediction.
All the code for this example can be found at the repository deeplearning4j-playground, more specifically at the file IrisClassifierPredictor.java.
Do you have comments or questions? send me a tweet!
Do you want to figure out how to load a trained machine learning model using Java and Deeplearning4j? Have a look at https://t.co/l4ohlyWykF , I would be glad to hear about your experience! #IEnjoySoftwareDev #java #machineLearning #fun #softwareEngineering
— Enrique Llerena Dominguez (@ellerenad) May 19, 2021
Subscribe via RSS