Machine learning with Java? Deeplearning4j! Part 3: Object and people detection in images
by Enrique Llerena Dominguez
TL; DR
- The goal of this post is to show, step by step, how to use Deeplearning4j to detect objects and people in an image.
- The pre-trained model Yolo2 is loaded from the Deeplearning4j’s Model Zoo.
- The images are preprocessed to fit Yolo2 requirements.
- The output of Yolo2 is used to mark the objects on the image as well as a tag.
- All the code for this example can be found at the repository deeplearning4j-playground, more specifically at the file Yolo2ImageClassifier.java.
Introduction
There are already a lot of pre-trained models that can be used for different purposes. Deeplearning4j provides a Model Zoo out of the box, so that reusing existing models is easier. It provides, for example, pre-trained models for text generation or image classification.
If we want to detect people or objects in images, one of the most popular trained models is YOLO, which stands for “You only look once”. If you want to learn more about it, here you have some resources:
In this example, OpenCV will be used for image processing.
Limitations of YOLO
As it happens with all the tools, this one also has limitations: you can just detect a fixed set of objects, for example:
| person | fire | hydrant | elephant |
| skis | wine | glass | broccoli |
| giraffe | toaster | bicycle | stop |
The full list contains 80 kinds of objects, and can be found here
Steps
- Load the YOLO2 model from the Deeplearning4j’s Model Zoo.
- Load the image to annotate.
- Preprocess the image.
- Feed it to the Yolo2 model.
- Get the output with detected objects or people.
- Annotate the original image with the zones where something was detected
1. Load the YOLO2 model from the Deeplearning4j’s Model Zoo.
Loading the YOLO2 model is easy achievable: we just need to use the class org.deeplearning4j.zoo.model.YOLO2; from
Deeplearning4j to build an instance of the ZooModel class, which after that will be used to load a ComputationGraph,
which is the model itself. This ComputationGraph can be operated with: we will feed it an image and it will return
a set of labels and coordinates for the detected objects.
private ZooModel yolo2Model;
private ComputationGraph pretrainedComputationGraph;
//...

yolo2Model = YOLO2.builder().build();
pretrainedComputationGraph = (ComputationGraph) yolo2Model.initPretrained();
labels = new COCOLabels();
2. Load the image to annotate.
In this step, we use the class NativeImageLoader from the datavec to load directly the image to an INDArray,
the basic data structure used by Deeplearning4j. This image is the “original” one, which will be annotated at a later step.
File fileOriginalImage = new File(inputImagePath);
INDArray iNDArrayOriginalImage = imageLoader.asMatrix(fileOriginalImage);
3. Preprocess the image.
Here, we will use the iNDArrayImage from the previous step, and we will transform it to match the requirements set
by YOLO2 regarding size, color scheme, and normalization:
// Width required by the YOLO2 Model
private static final int YOLO2_WIDTH = 416;

// Height required by the YOLO2 Model
private static final int YOLO2_HEIGHT = 416;

//...

NativeImageLoader yoloImageLoader =  new NativeImageLoader(
        YOLO2_WIDTH, YOLO2_HEIGHT, 3, new ColorConversionTransform(COLOR_BGR2RGB));

// Resize the image to match the required size by YOLO2
Mat matResizedImage = yoloImageLoader.asMat(iNDArrayOriginalImage);
And then, we proceed with the normalization of the image:
// Scale the images, as in "normalize the pixels to be on the range from 0 to 1"
ImagePreProcessingScaler scaler = new ImagePreProcessingScaler(0, 1);
INDArray iNDArrayTransformedImage = yoloImageLoader.asMatrix(matResizedImage);
scaler.transform(iNDArrayTransformedImage);
4. Feed it to the Yolo2 model.
Once the image complies with the format requirements, we can feed it to YOLO:
// Perform the classification
INDArray outputs = pretrainedComputationGraph.outputSingle(
        iNDArrayTransformedImage);
5. Get the output with detected objects or people.
Then, we feed the outputs from the previous step to the YoloUtils, along with two thresholds, defined by the docs as:
- confThreshold – Detection threshold, in range 0.0 (least strict) to 1.0 (most strict). Objects are returned where predicted confidence is >= confThreshold
- nmsThreshold – passed to nms(List, double) (0 == disabled) as the threshold for intersection over union (IOU)
List<DetectedObject> detectedObjects = YoloUtils.getPredictedObjects(
      Nd4j.create(((YOLO2) yolo2Model).getPriorBoxes()),
      outputs,
      DETECTION_THRESHOLD,
      NMS_THRESHOLD);
6. Annotate the original image with the zones where something was detected
Once we have the list of detected objects, we can mark the image with the found objects or people. In this case, we are using some OpenCV utilities for that.
private void annotate(int imageWidth,
                      int imageHeight,
                      Mat rawImage,
                      List<DetectedObject> detectedObjects,
                      String outputImagePath) {
    for (DetectedObject detectedObject : detectedObjects) {
        // Mark the detected objects with a rectangle and its label
        // Calculate the positions of the corners of the rectangle
        double[] xy1 = detectedObject.getTopLeftXY();
        double[] xy2 = detectedObject.getBottomRightXY();
        String label = labels.getLabel(detectedObject.getPredictedClass());
        int x1 = (int) Math.round(imageWidth * xy1[0] / GRID_WIDTH);
        int y1 = (int) Math.round(imageHeight * xy1[1] / GRID_HEIGHT);
        int x2 = (int) Math.round(imageWidth * xy2[0] / GRID_WIDTH);
        int y2 = (int) Math.round(imageHeight * xy2[1] / GRID_HEIGHT);
        // Draw the rectangle
        rectangle(rawImage, new Point(x1, y1),
                    new Point(x2, y2), Scalar.RED, 2, 0, 0);
        // Draw the label
        putText(rawImage, label, new Point(x1 + 2, y2 - 2),
                    FONT_HERSHEY_DUPLEX, 1, Scalar.RED);
        // Store the file on disk
        imwrite(outputImagePath, rawImage);
    }
}
Output
This is an example of the kind of output you can expect from YOLO, and I found it quite impressive compared to the small effort required to use it.
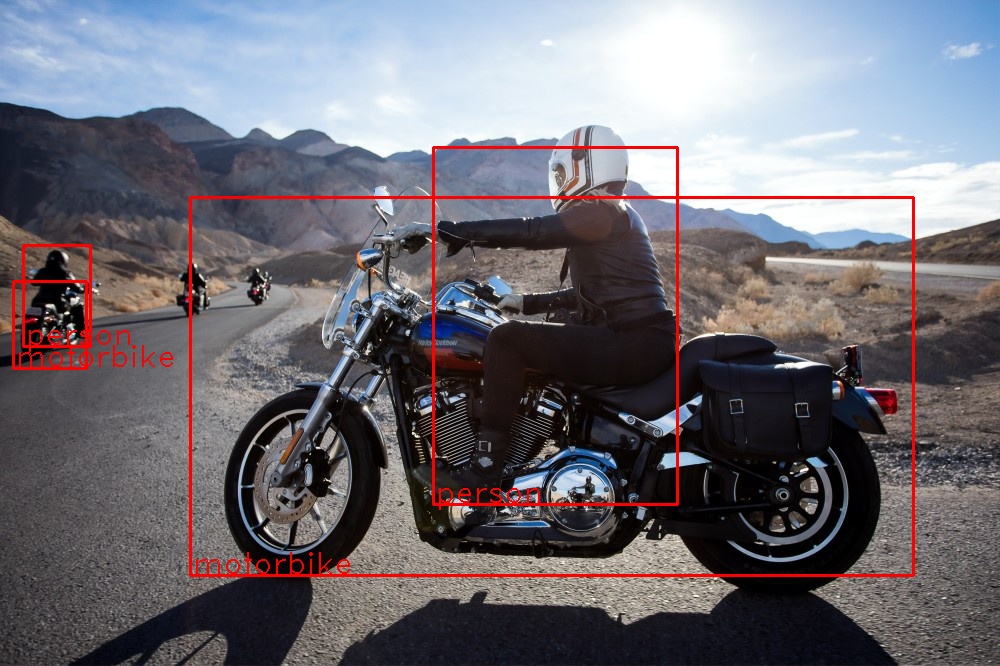
In this first example, we see how it detected a couple of motorcycles and people riding them:
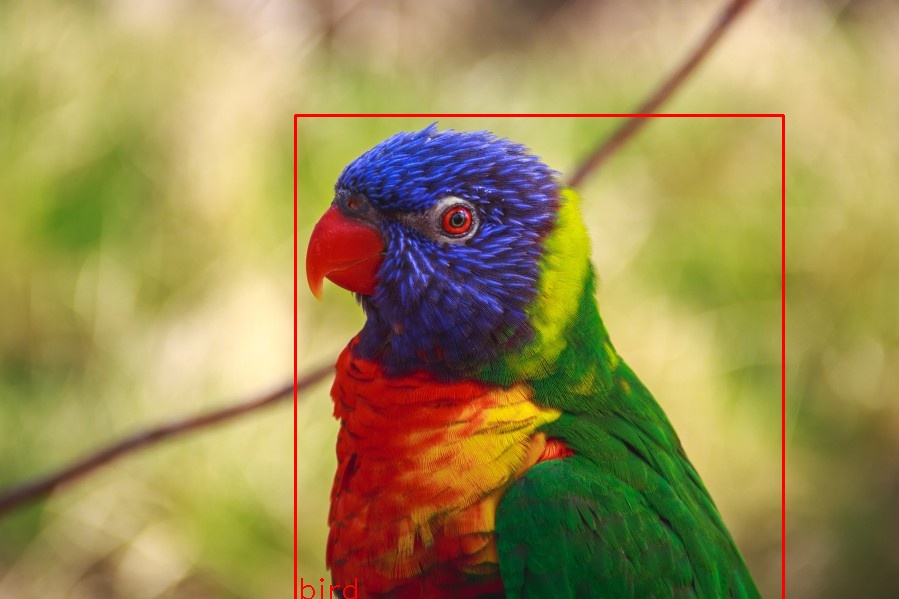
Now, we see how YOLO2 was able to detect a bird, even if it is not complete in the image:
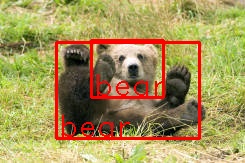
But of course, YOLO2 (or at least this implementation by Deeplearning4j) has its limitations. In the below examples we can see them.
Here, we can see how YOLO2 detected 2 bears, even if we can see that there is just one:
And here, YOLO2 detected an elephant where a bear can be seen:
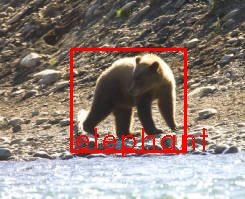
Lesson learned: Always execute enough tests against a dataset similar enough to your use case.
Conclusion
In this example, we saw how to use Deeplearning4j to detect people and objects in images. To achieve this, we had to load the YOLO2 model from the Deeplearning4j’s Model Zoo, load an image, preprocess it, feed it to the model, and use the output from the model to annotate the original image. We also saw some limitations of YOLO2, like the number of objects it can detect or that the output is not always accurate.
I hope you found this content useful! I would love to hear feedback from you! Send me a Tweet!
Do you want to learn how to detect people and objects on images in less than 120 lines of code, using Java and Deeplearning4j? Have a look at this step-by-step guide! Code included ;)https://t.co/ZQIClNR38D#IEnjoySoftwareDev #SoftwareEngineering #DeepLearning #MachineLearning
— Enrique Llerena Dominguez (@ellerenad) May 26, 2021
Subscribe via RSS